
Centerpiece 3.0 User Guide
QUICK START GUIDE
Welcome
Thank you for purchasing the LB Swag Centerpiece 3.0 — a fully custom, hand-engineered replica of the full size creations floating on the water around belmont shore in Long Beach during the holiday season!
This device was designed and manufactured in our local community and features:
- 40 Ultra Bright RGB LEDs, 10 on each column
- Rechargeable lithium-ion batteries with up to 12 hours of runtime
- Universal USB-C charging
- Custom PCB with Advanced MCU
- Built-in web control interface
- OTA software updates with fixes, improvements, new themes and features!
- Individually addressable RGB LEDs
- 0.96" OLED Display status screen
- Clean, self-contained lighting system
Please take a moment to review this guide to ensure safe use, proper operation, and maximum enjoyment.
What's in the Box
- LB Swag Centerpiece 3.0
- USB-C charging cable
- Quick start card
- (Optional) AC power adapter
Overview of Features
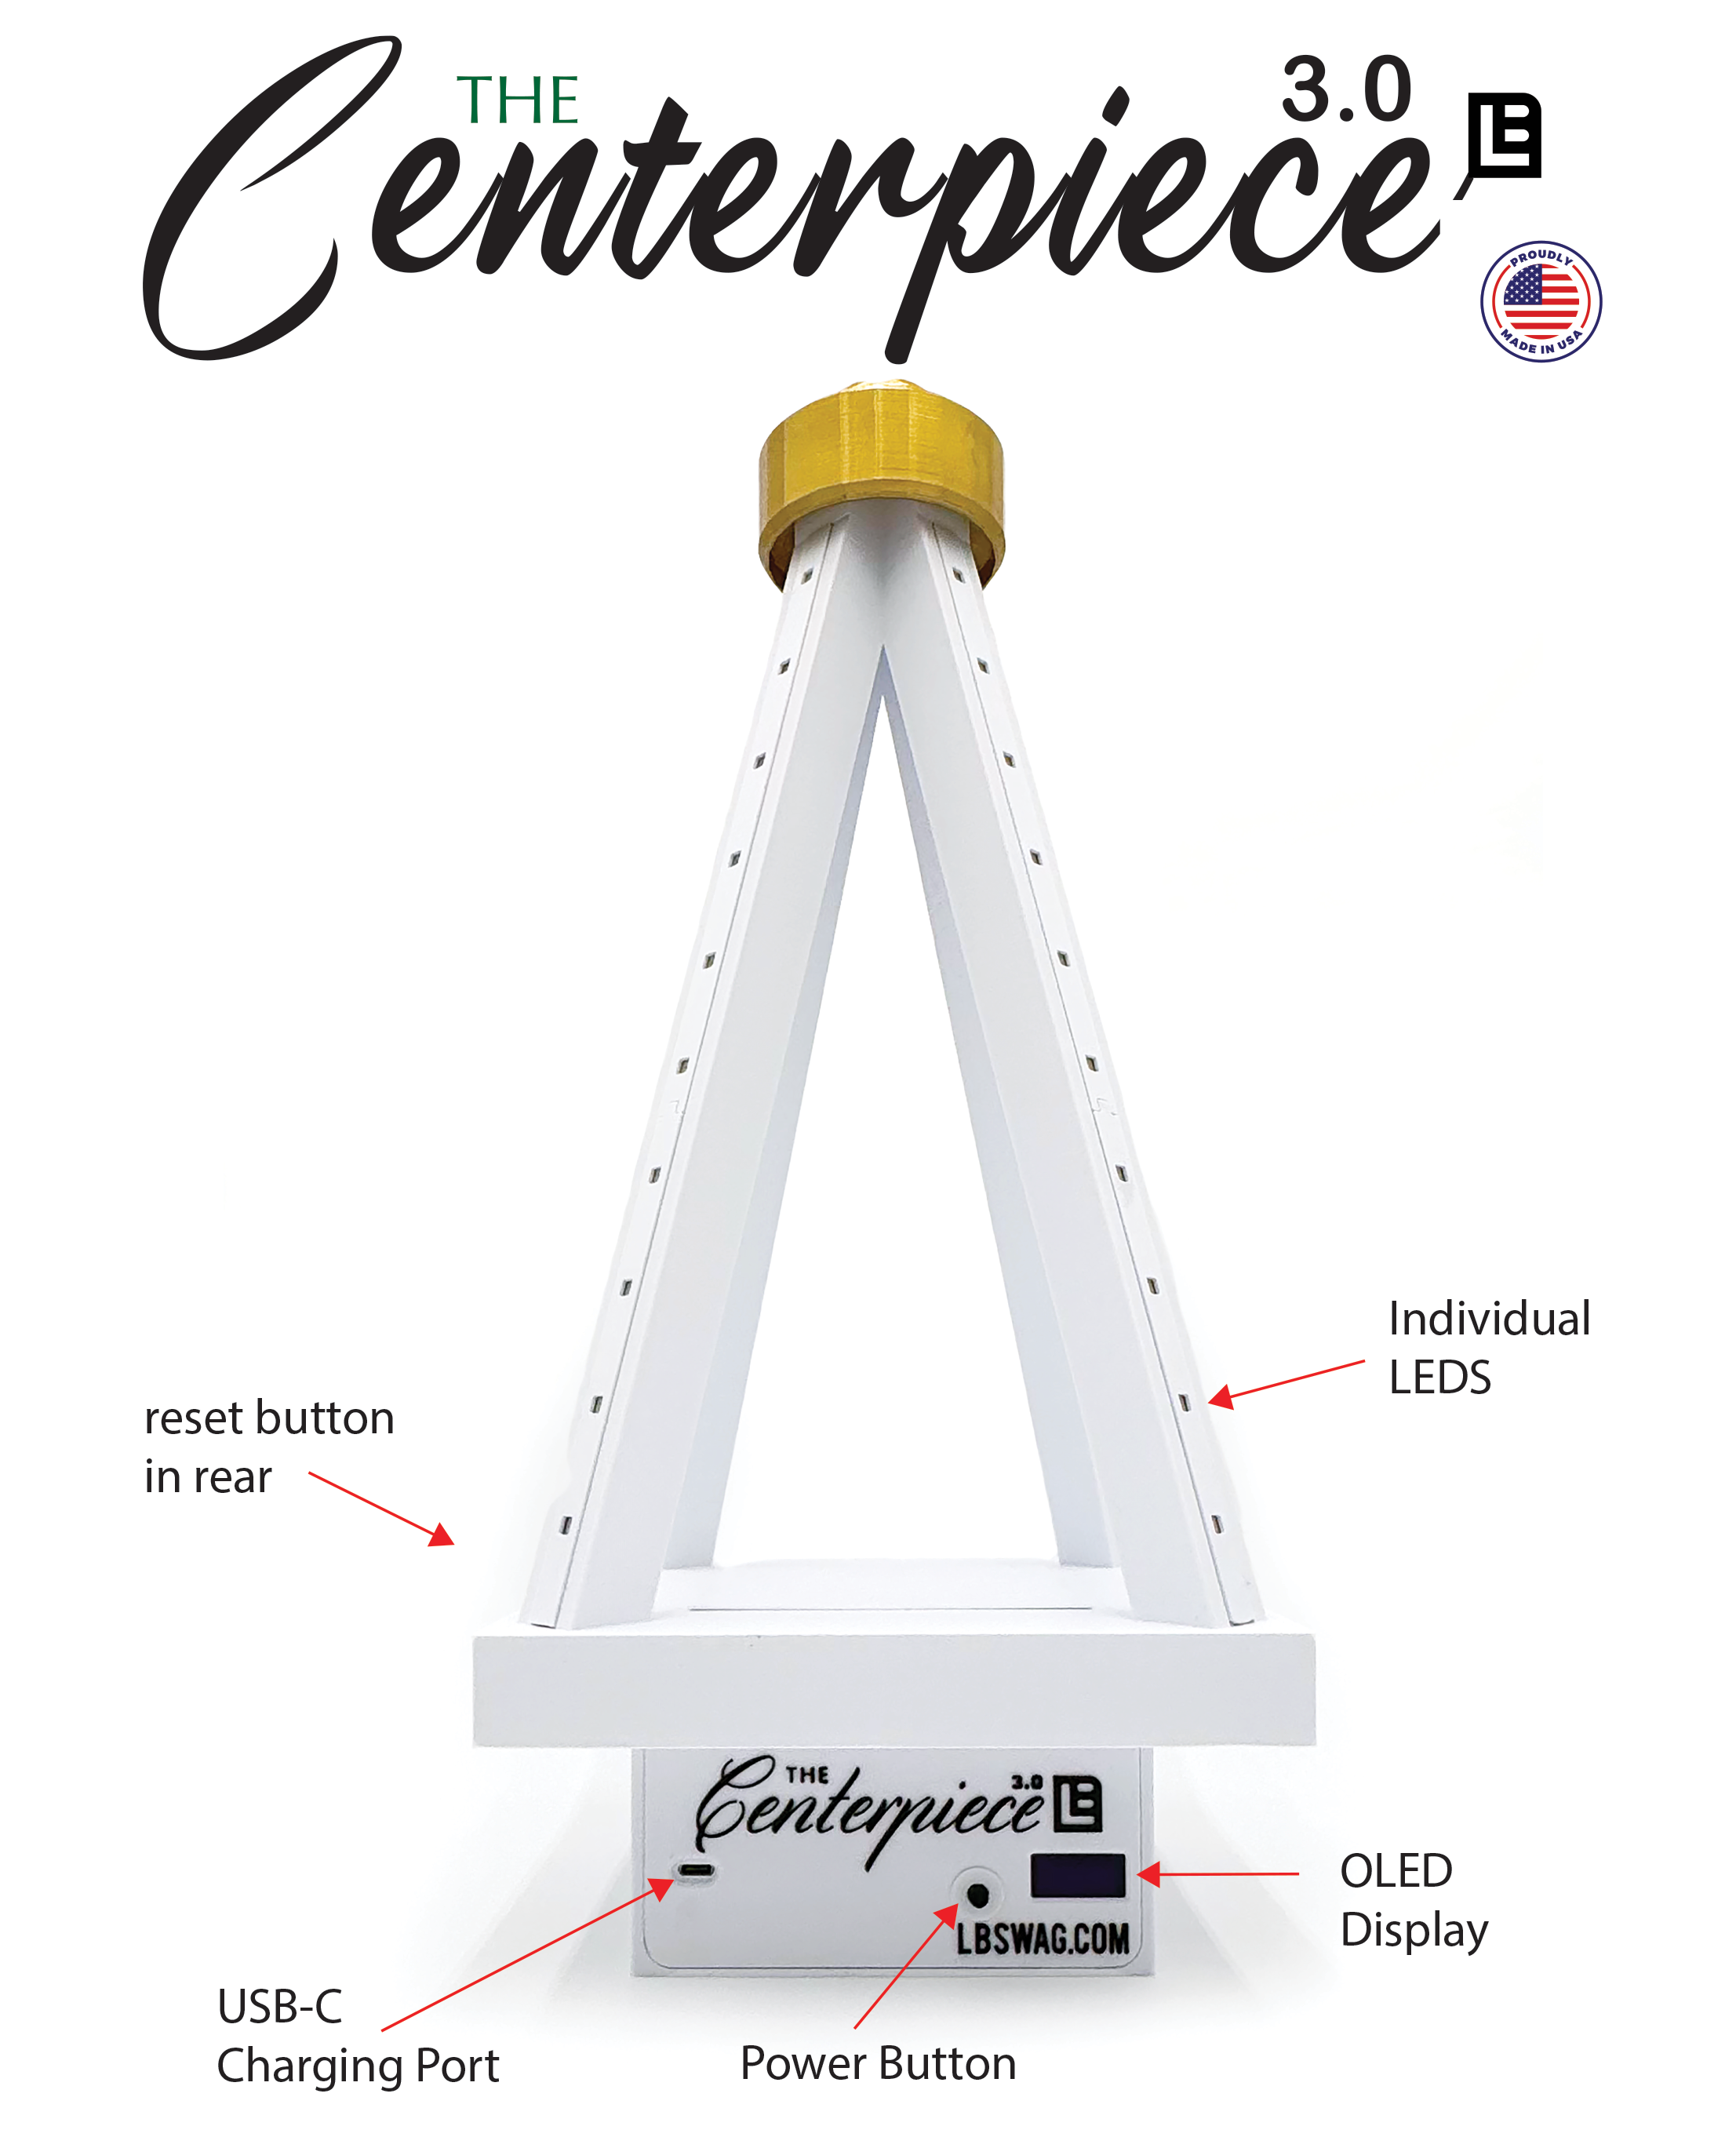
Front Panel (see image above)
- Power Button — Press once to turn ON, double-press to turn OFF
- 0.96" OLED Display — Shows battery %, WiFi mode, brightness, voltage, and connection information
- USB-C Port — Charging only (5V input)
Default Settings
- Theme: Christmas Flash
- Brightness: 128 (out of 255)
- WiFi Mode: Stand-Alone (creates its own network)
- All settings are saved automatically and persist across power cycles
1. Powering On + First Use
Power On
Press the front power button once.
The OLED Display will show:
- Battery percentage — Current charge level
-
WiFi status — Shows either the AP network name (
cp3-XX) or your connected WiFi name -
Password or URL — When in AP mode, shows the WiFi password. When connected to home WiFi, shows
http://cp3.local - Brightness level — Current LED brightness setting
- Voltage — Battery voltage reading
The LEDs will start with the default animation.
Turn Off
Perform a quick double-press of the power button.
The device will shut off immediately after the second press.
2. Controlling Your Centerpiece
To control your centerpiece, you have two options:
Option 1: Stand-Alone WiFi Mode (Recommended for First-Time Setup)
In this mode, your centerpiece broadcasts its own WiFi signal. This is the default mode when first powered on or after a reset.
The device creates its own Wi-Fi network:
-
Network Name (SSID):
cp3-XX(where XX is a random number from 1-99) - Password: An 8-character code displayed on the OLED Display (uses numbers 0-9 and letters A-F)
Steps to Connect:
- Open Wi-Fi settings on your phone or laptop
- Join the network shown on the OLED Display (enter the password when prompted)
- A web page will open automatically (this is called a "captive portal") — this is the Control Dashboard
If no web page opens automatically:
Open your web browser (Safari, Chrome, Firefox, etc.) and go to:
Option 2: Join Your Existing WiFi Network
Connect your centerpiece to your home or venue WiFi network. This allows you to control it from any device on the same network without connecting to the centerpiece's own WiFi signal.
Steps to Join Your WiFi:
-
First, connect to the
cp3-XXnetwork (the device's own Wi-Fi network) using Option 1 above - Open the Control Dashboard in your web browser
- Tap or click the "Join Wi-Fi" button
- Wait for the network scan to complete (this may take 15-30 seconds). The device will scan for available WiFi networks and display them in a list
- Select your home Wi-Fi network from the list
- Enter your Wi-Fi password when prompted
- Wait for connection — The device will attempt to connect (up to 10 seconds). You'll see a success message when complete
After successfully joining your WiFi:
- The device will reboot and reconnect (this takes about 10-15 seconds)
- The
cp3-XXnetwork will disappear — this is normal. The device's own WiFi signal is disabled when connected to your home network - The OLED Display will show: "Connected: [Your WiFi Name]"
- To access the control panel:
- Look at the OLED Display for the assigned IP address
- Open your web browser and enter that IP address in the address bar
- Or open your web browser and go to: http://cp3.local
Important: Your phone/tablet must be on the same Wi-Fi network as your centerpiece.
Note: If you need to reconnect to the device's own WiFi network (for example, if you change your home WiFi password), you'll need to perform a factory reset (see Section 4).
Control Dashboard Features
Once connected (using either option above), the Control Dashboard displays:
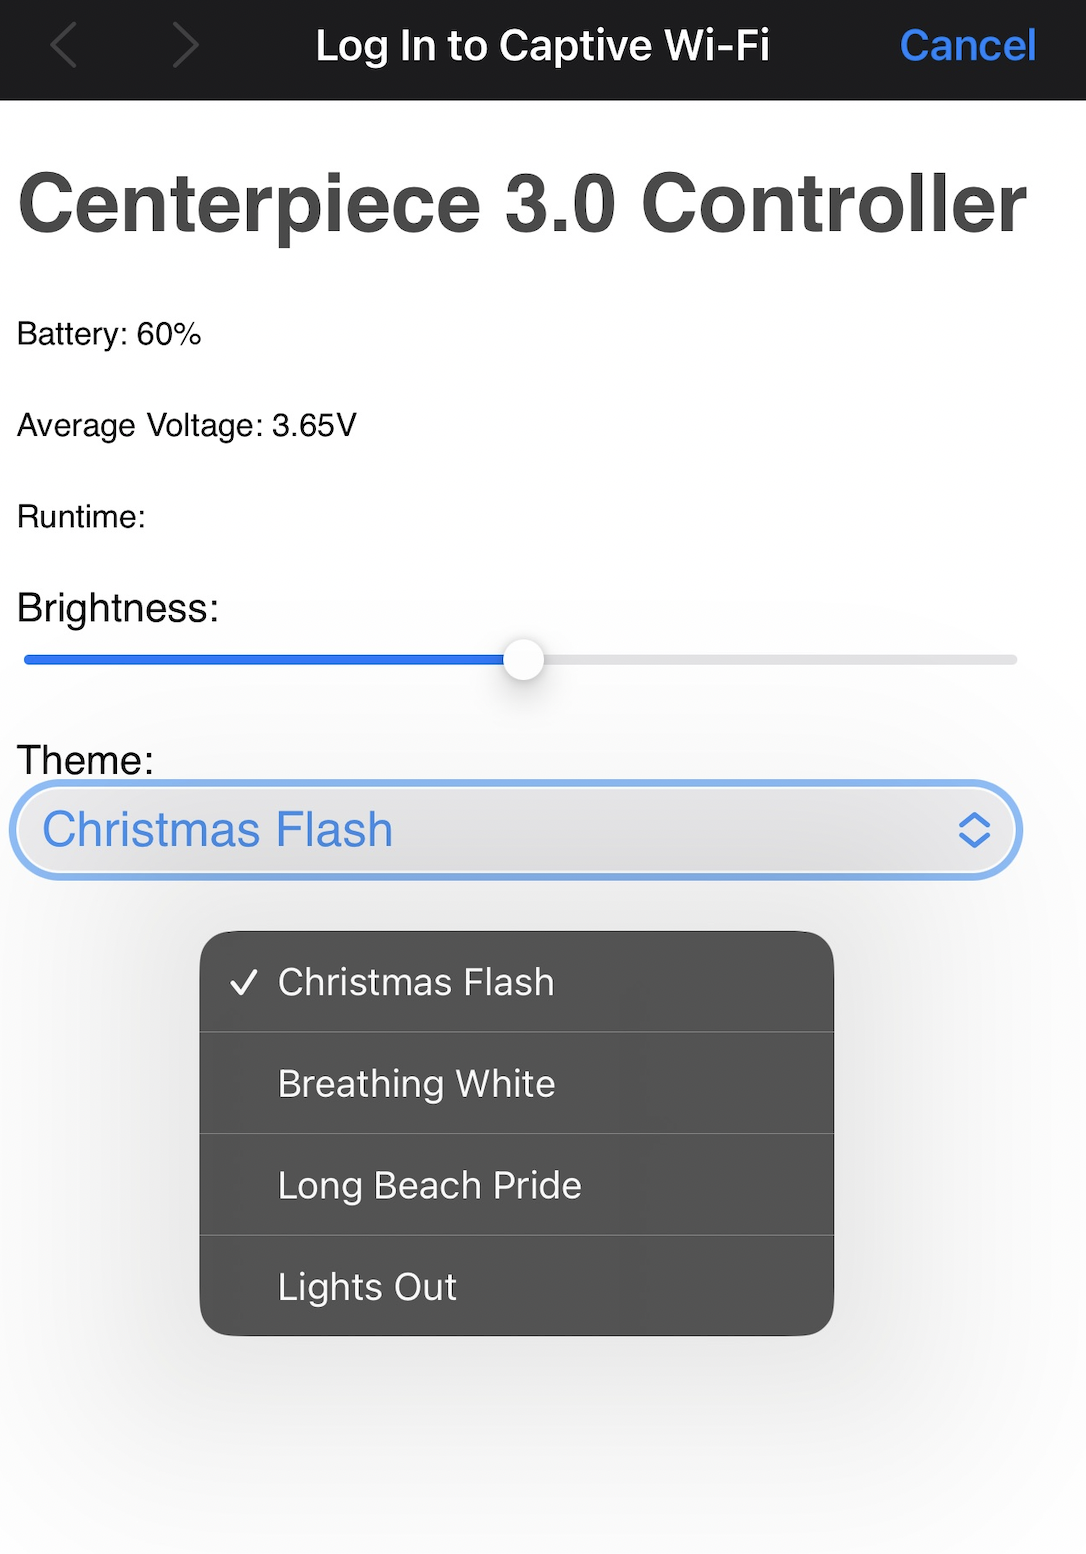
Battery Status
- Battery percentage — Current charge level
- Average Voltage — Battery voltage reading
- Runtime — Time since power-on
Lighting Controls
- Brightness — Adjust using the slider control (range: 40-255)
-
Theme — Select from available themes:
- Christmas Flash (default)
- Breathing White
- Long Beach Pride
- Lights Out
- Your brightness and theme selections are saved automatically and will be remembered when you power the device on again
Firmware Updates (OTA)
- Automatic update checking — When connected to your home WiFi, the dashboard automatically checks for firmware updates
- Update availability — If a new version is available, an "Update (recommended)" button will appear with release notes
-
Requirements:
- Device must be connected to your home WiFi (not in Stand-Alone mode)
- Your WiFi must have internet access
- Battery should be above 50% for safe updating
- During update: The OLED Display will show "Firmware Updating" — do not turn off the device until the update completes and the device reboots
- Updates include bug fixes, new themes, and feature improvements
3. Charging the Centerpiece
USB-C Charging
- Plug supplied charge cable into the USB-C charge port (Front of device)
- Located on the front
- The OLED Display will indicate battery is charging
- Full charge typically takes 3–4 hours
- Runtime on full charge: ~12 hours (depending on brightness & LED theme)
The OLED Display shows charging status and battery percentage.
Battery Tips
- For best longevity, keep between 20%–80% when possible
- Avoid draining to 0%
- The OLED Display displays real-time voltage & calculated percentage
- Low battery protection: If the battery voltage drops very low (below 3.0V), the device may automatically reduce LED brightness to preserve battery life
- If the device won't power on, charge for at least 30 minutes before trying again
4. Factory Reset (Rear Button)
Use this when:
- Changing locations
- Wrong Wi-Fi password saved
- You want fresh setup
- Need to troubleshoot
How to Reset
The reset button is located opposite the front panel, in the rear of the device.
- Turn device ON
- Locate the reset button on the rear of the device (opposite the front panel)
- Hold the rear reset button for 5 seconds — the LEDs will turn off and the OLED Display will show "Resetting"
- The device will reboot and return to Stand-Alone WiFi Mode (AP Mode)
- A new random SSID and password will appear on the OLED Display
What gets reset:
- All saved WiFi credentials (returns to Stand-Alone mode)
- LED brightness setting (returns to default: 128)
- Theme selection (returns to default: Christmas Flash)
- AP network name and password (generates new random values)
⚠️ Contains Lithium Ion Batteries!
5. Safety & Maintenance
General Use
- Indoor use only — Do not expose to moisture, rain, or outdoor elements
- Keep device away from water, moisture, kitchens, aquariums, or damp areas
- Do not expose to direct sunlight, heater vents, or other heat sources
- Keep away from flammable materials while operating
- Do not modify — Opening the enclosure or modifying components may cause damage and void warranty
- Children — Keep out of reach of small children due to small parts and electrical components
Lithium-Ion Battery Safety
This product contains lithium-ion batteries.
To ensure safe battery operation:
- Charge only using the built-in USB-C port
- Do not attempt to open the enclosure or access the batteries
- Do not puncture, crush, or drop the device
- Stop using immediately if the enclosure becomes warm, swollen, or damaged
- Store between 32°F–95°F (0°C–35°C)
- Charge the unit at least once every 3 months if unused
- Do not leave connected to power for days at a time — unplug once charged
- Use only the provided USB-C cable and charger. Do not use damaged cables
- Do not charge unattended for extended periods
Battery Care & Maintenance
- Keep between 20–80% when possible for best longevity
- Avoid storing fully charged or fully empty
- Recharge every 3–6 months when unused
- Keep in a cool, dry environment
- Avoid draining to 0%
Physical Care & Cleaning
- Wipe with a dry microfiber cloth
- Do not use chemicals, solvents, alcohol, or cleaners on the white surfaces or LED diffuser windows
- To clean: Use a dry microfiber cloth and lightly dust only
- Do not expose to moisture
6. Quick Troubleshooting
| Issue | Solution |
|---|---|
| Device will not power on |
|
| Cannot find cp3-XX network |
|
| No captive portal / Web page not loading |
|
| Joined home Wi-Fi but cp3.local not loading |
|
| LEDs flicker or show incorrect colors |
|
| Firmware update fails or not available |
|
| Cannot reconnect to device after joining home WiFi |
|
7. Warranty & Support
Your Centerpiece 3.0 is backed by LB Swag's 1 year limited warranty covering parts and labor.
For support or replacement parts:
help@lbswag.com
https://LBSWAG.com
Final Notes
- This product is designed, machined, printed, assembled, and programmed entirely in-house.
- Thank you for supporting a local Long Beach business and helping keep us going.
- We hope your Centerpiece becomes part of your holiday tradition.
Product Page: https://lbswag.com/collections/new/products/lb-swag-centerpiece-3-0-long-beach-christmas-tree-replica